Friday, January 29, 2010

Wow!! Look at Marian's A Fair Maiden's Etui!!

I was very excited to receive these photos from Marian H. of Baton Rouge, Louisiana of her A Fair Maiden's Etui! I immediately called Tom over to the computer to see her beautiful work. As you can see, she truly did an incredible job with this piece.

Marian wrote, The etui is finished-finally. I think it took longer to put it together than to stitch it. I used the materials suggested in the directions. I changed the bottom stitchery: I wanted a verse of scripture. Everything else is the same. It is now my "pride and joy".

What I might change: I'm not really a "pink bow" person, but it works for now. The pearl ruler adds a lot of weight to that side of the etui. But again, it works. Next time I might crochet the closures. I've never been able to do one of "those things".

It's been a delight to work on this. And a whole lot of pride seeing the finished project. I don't regret one minute of time I spent on it. Please keep designing these wonderful things!
view of 2 sides of Marian's etui View of 2 of the other etui sides
Inside view of Marian's etui
Bottom and side views of Marian's etui
You may remember that Marian changed the verse on the chart to one she preferred.Marian, you have very right to be very proud of your accomplishment!! As you are aware, the actual stitching was fairly simple, but the assembly was involved. Hopefully all of the assembly diagrams were helpful.

Thank you very much for sharing these photos of your "pride and joy"! Maybe we'll see other projects from you someday.

Wednesday, January 27, 2010

Who was Mrs. Waddelow?

Sometimes the hardest part of producing a new design is coming up with a name. I had really been “stuck” trying to name my new huswif. I had been calling it Unnamed Huswif, but knew I certainly needed something more fitting. The other day I came up with Mrs. Waddelow’s Huswif. (Don't you love the name "Waddelow"? I know it makes me smile whenever I say it.)

Mrs. Waddelow was indeed a real person. In fact, she was my great-great-great-great-great-great-great-great-grandmother. We know very little about Amy. We don’t even know her maiden name. Amy is believed to have been born in England around 1610. She later moved to Accomack County, Virginia where she married Nicholas Waddelow who had also been born in England.

Accomack County is on the Delmarva Peninsula and was so named because Delaware and parts of Maryland and Virginia are there. The peninsula is almost 180 miles long by 60 miles wide at the widest point. It is bordered by the Chesapeake Bay on the west, and the Delaware River, Delaware Bay, and Atlantic Ocean on the east. Many also call the areas of Maryland and Virginia that are on the peninsula the “Eastern Shore” because they are east of the Chesapeake Bay.

Amy and Nicholas Waddelow had three daughters, Patience, Temperance, and Comfort. Descendants have lived in Accomack County to this day.

Of course, I don’t know if Amy ever had a huswif, but I would like to think she did. Surely she could have needed one to hold her needles, threads, and scissors.

My inspiration for Mrs. Waddelow’s Huswif came from some of the old huswifs I’ve seen. Typically they are made from a variety of printed-cotton fabrics, most likely leftover scraps. The inside of my huswif uses five different fabrics. There are four pockets--three flat and one gathered--plus some thread rings. Many old huswifs also had printed-cotton fabric on the outside. Instead, I chose to use linen with a simple embroidered floral design worked with one overdyed thread color.

And now you know, “the rest of the story” of Mrs. Waddelow and her huswif, and I find myself longing to go back to the Eastern Shore.

Monday, January 25, 2010

Miscellaneous thoughts and ramblings....

Thank you to those who wrote about my dilemma with my original start on Ann Hair.

JoAnn mentioned that a piece of muslin could be sewn to the side with the narrow margin. I know about that, but since I had so little stitching done relative to the finished piece, I decided that I would cut my losses and just begin again.

Katherine asked if I thought about what I would do with my original stitching. I think I’m going to make a long, thin pillow. I have already finished the vine and most of the flowers along the top and two very long lines of the verse cross stitched over one linen thread. I’ll probably wait until I complete Ann before making the pillow because I’m hoping to have enough thread to add a vine and flowers below the verse.

The Nashville Needlework Market will be here before you know it. Quaker Sampling III is framed, and the charts are printed and packaged. We're now putting the finishing touches on Mrs. Waddelow's Huswif and Within My Heart Sewing Case. I hope you'll like all three designs. If you're interested, in a few days I'll tell you who Mrs. Waddelow was.

Meanwhile, here is an old photo I found from the 2004 Nashville Needlework Market. From this vantage point, things look pretty much the same every year. Can you spot my banner hanging over the railing? It may be a challenge since the photo isn’t that clear.

Friday, January 22, 2010

Carol's Multiplication Table Examplar and a yummy chocolate dessert!

How delighted I was to receive this photo from Carol B. of Baltimore of her Multiplication Table Examplar! This is the first one of these that I’ve seen framed in the wonderful hornbook frame that Valley House Primitives made especially for this project. Didn’t Carol do a wonderful job?

Carol wrote, I knew as soon as I saw the piece that this was one that I was going to stitch. I ordered supplies and got started right away. I started with the motifs at the top and worked my way down so that I could start on the grid. I don’t think I have ever counted and recounted so many times!! I didn’t want to find out at a much later date that the grid was counted wrong. Once that was in, my plan was to put in all of the motifs at the top and bottom and save the numbers for last. Finally I just couldn’t stand it any longer and I had to put some numbers in – just to see how it was going to look!! From then on I switched back and forth between motifs and numbers. One of the ladies at the Stitching Post (where I had it put in the hornbook frame) asked me how I could possibly have stitched all of those numbers. I told her I was good until about the last 16 or so!! By then they were all double digit numbers and I thought I would never be done!! But I persevered and absolutely love the finished product. Of course, before I dropped it off at the framers, I checked and double checked that all of the numbers were in the right place! How embarrassing would it have been if the table didn’t “work”??!!

The piece is a well traveled piece – it was what I took with me on our Bahamian cruise over Thanksgiving. I stitched on it in Charleston, Key West, and Nassau!

For now the piece will hang in my office. I like going in to the office every morning and seeing my stitched pieces on the wall! It makes me happy!!

Carol, I did the same thing with the numbers. Not only did I check myself, I asked Tom to check. It sure would be embarrassing to have made a mistake on the chart and my model, right? My model hangs over the desk in my office.

You may remember seeing some of Carol’s lovely needlework in earlier blog posts. I’m amazed at all the wonderful pieces she accomplishes since she works full time and travels quite a bit. Another project that I know she has in the works is A Work’d Pocketbook--remember the project with all the queen stitches? Maybe we’ll get a progress report soon.

Over the Christmas holidays, Carol mentioned she was making a chocolate truffle. Being married to a “chocoholic”, I asked her if she would share the recipe which she gladly did. Wow--is this recipe not only delicious but also fast and easy, leaving you more stitching time! I’ve made it three times in the last month, and each time folks rave about it! I asked Carol if I could share the recipe with you. (Thanks, Carol.)

Chocolate Truffle
1 family-size package of brownie mix
1 large package of instant chocolate pudding
1 large container of cool whip, thawed
1 package of Heath toffee bits (If desired, you can use crushed Heath bars instead.)

Make the brownies following the package directions, and bake in a 9 x13- inch pan. Cool the brownies, and cut into squares.

Place half of the brownies in the bottom of a large glass bowl.

Make the pudding following the package directions, and pour half over the brownies in the bowl. Then top with half of the cool whip and half of the Heath toffee bits. Repeat the layers.

Cover and refrigerate.

This looks particularly lovely in a trifle bowl as you can see in the photo taken last night. (I made this for Tom to take to a meeting at church.)

I need to make this dessert the next time our son and daughter-in-law come home. The last two times they were here, I made it, but took it to gatherings….I came home with an empty bowl! I don’t see why I couldn’t do the same thing with smaller packages of brownie mix, pudding, and cool whip.

Thursday, January 21, 2010

a decision has been made

Tuesday night I finished stitching Amy Eliza Herbert, and Wednesday I took her to Carol’s to be framed. Also I decided to choose my next sampler.

The Truth Sampler and The German Sampler were strong contenders. However, I couldn’t find The Truth Sampler (I know it will show up…someday.), and I wasn’t in the mood to go back to The German Sampler. (I know I will someday--it’s about a third done.)

Next, I started going through my charts and came across two I particularly liked. Both of the samplers had been SALs with my newsletter group, With My Needle and Pen, but I had never stitched them. I was torn between John Foster by Historic Stitches and Ann Hair by The Scarlet Letter. I kept going back and forth between the two samplers.

I have always liked John Foster…such beautiful colors. It is smaller than Ann Hair and is done entirely in cross stitch over two linen threads so it would be an easier and more relaxing “stitch”. Ann Hair is also such a beauty, and I’ve long been enamored of this sampler….I even have an Ann Hair coffee mug, coaster, and note cards! Also on the "positive" side, I already have the linen and threads packaged and ready to go. On the "negative" side, Ann is larger and more complex than John. Which should I choose?

I chose Ann.

I next went through my 2003 With My Needle and Pen newsletters and printed out all the SAL stitching notes. Then I set up my ironing board to give the linen a pressing before I started stitching. Imagine my surprise, when I found I had already stitched the top border and the first two lines of the verse (stitched over one linen thread!). Wow! I guess this was meant to be….but then, I discovered why I had put Ann away. I had not figured well on my linen….I only had a one-inch margin on the right side. I’m sure that Carol could have figured out a way to frame Ann with such a narrow margin, but I decided that perhaps I really should start Ann again with a more generous margin. I just need to “cut my losses” and move on.

Ann’s new linen is pressed, and I even got in a few stitches last night. The original linen has been put away. Perhaps one day, I’ll use it for John Foster.

Tuesday, January 19, 2010

another WIP "bites"the dust!

On New Year’s Eve, I posted a list of my 2010 needlework goals. (I like the word “goals” versus “resolutions”. The word “resolutions” at times can seem intimidating.) One of my goals was to complete two works-in-progress (WIPs).

Like many of you, I have accumulated quite a few of these over the years. In the fall, I dug out Amy Eliza Herbert, a reproduction sampler from the DAR, that I started before I began designing in 1999. I had about a third of it stitched when, for some unknown reason, I put the sampler aside. As you can see from the photo below, I am nearly done. I need about half an hour to complete the satin stitched sawtooth band near the bottom of the sampler.

In the next photo you can see where I backstitched my name, city, and state. (It is not as crooked as it looks in the photo—remember my linen hasn’t been mounted yet.) Usually I stitch the year also, but since I started the piece so many years ago, I left the year off. None of this information will not show when the sampler is framed.

I find myself with mixed emotions as I put in the last stitches on this wonderful sampler. On one hand, I am so pleased to at long last have Amy completed, but on the other hand, I find myself sad that Amy and I will no longer have our “special time” together. Do any of you feel the same way when you complete a project?

I’ll soon choose my next WIP to finish. I haven’t looked through my baskets yet, but two samplers that readily come to mind are The German Sampler from The Examplarery and The Truth Sampler from Samplers of Sylke. I’ll let you know when I make my decision.

Happy stitching!

Saturday, January 16, 2010

Marian's Quaker Schoolgirl Needle Necessities

Marian H. from Baton Rouge, Louisiana stitched this lovely version of Quaker Schoolgirl Needle Necessities in 2007.

Marian wrote, The kit was made with the materials called for. The thread color was perfect. I completed it myself. It took several days for me to get my head together to decide I could do it. Once started, it was a breeze. Really no different that putting together a Christmas ornament. I love anything quaker and would really like to visit the Ackworth School. Hopefully one day I will.

I’m almost ready to complete the "Fair Maiden’s Etui". The stitching is done. I just have to backstitch two more triangles. Again, I thought I might have trouble putting it together, but I think it’s firmly in my mind now. I have all the materials ready. Just need to finish the backstitching.

I won a bet on the game last night and my prize is to be a piece of Silkweaver’s linen. I’ve earmarked it for your strawberry needleroll!

Case Front Case Back

Case Interior

Thanks, Marian, for sharing photos of your lovely workmanship. Sounds like we'll have some more photos from you soon! I certainly hope so!

Wednesday, January 13, 2010

commemorating a special occasion...

I was recently asked me if I do custom designs. I’m sorry time doesn’t permit me to do any, but I made the following suggestions to the needleworker who inquired specifically about a wedding sampler. Perhaps these ideas are things you might like to consider also. Many of the same ideas would also work well for a birth or anniversary sampler.

Adorn Thy Heart
Below you can first see a photo of the sampler as it appears on the chart cover. I also sticthed the design as a wedding sampler for my son and daughter-in-law as shown in the second photo. You can also create a smaller sampler by omitting some of the bands on the sampler.
When This You See
Leave off the text and perhaps a couple of bands at the top, and put the wedding information there.
Let Virtue Be A Guide to Thee
Leave off the alphabet and verse and put the wedding information in those areas. If you want a smaller sampler, leave off the floral border and just do the area inside the inner border. Another idea is to do the outside borders and the inner border, and put just the wedding information on the inside.
Kind and True
Leave off the verse and put the wedding information in that area. Another idea is to lengthen the sampler by extending the side bands, and put the wedding information at the bottom of the sampler. Family Ties
Leave off the verse and put the wedding information in that area.
Family Record Samplers
Put the last name (surname) of the wedding couple at the top, and then put all their wedding information in the area below that. You can still keep the cartouches on either side and put the surname initial there. Leave off the names of the grandparents. Put the family surname initial at the bottom in the center cartouche.

Let your creative juices flow and see what you can do to create a special commemorative sampler which will surely become a family heirloom!

Saturday, January 9, 2010

a glimpse into my world....

On Friday, I picked up my Mary Busby sampler from Carol, my framer. I am so happy with the result!My original plan was to hang Mary in our bedroom, over our bed, along with Ann Trump, Maria Spence, and Mary Wigham, but when I laid the samplers together I realized it would be too crowded to hang them where I had planned. It was back to the drawing board. I ended up hanging the four “gals” over my dresser instead. Several months ago we stripped the bedroom wallpaper (floral with a lovely blue background), and decided to go with paint instead. This was quite a change after many years with the wallpaper. My goal was to have a wall color that would really show off the samplers which had been “lost” on the busy wallpaper. We went with a neutral paint color which not only looks beautiful with the samplers (all 22 of them!) but also with our new drapes and cornices. The crewelwork cornices are such a wonderful feature!

Friday, January 8, 2010

Look at Francesca's wonderful Quaker Schoolgirl Needle Necessities!

Wow!! Look at what Francesca from Italy did with Quaker Schoolgirl Needle Necessities! Instead of making a pocket on the inside of the case with the same fabric as the lining (like I did on my model), Francesca decided to cross stitch her pocket using motifs from elsewhere in the product. She also added two little charms. Isn’t the result magnificent? I love it, Francesca!

Francesca stitched her project on 32-count Flax Belfast linen from Zweigart. She used two plies of Milady’s Teal embroidery thread from Crescent Colours. On my model, I only used one ply of thread, but Francesca wanted more coverage and decided to use two plies instead.

view of Francesca's sewing case front
view of the sewing case front and back
view of the inside of Francesca's case showing her lovely stitched pocket

Francesca wrote, I'm 40 years old, and I live in Rome, Italy. I love embroidery in general, especially reproduction samplers, Quaker motifs, and crewel embroidery. I started when I was very young in school, only 7years old, and my teacher was a nun. Since that time I've always stitched. It relaxes me very much and brings my mind far from daily problems. I had a lot of fun working on this project, and it's my first “Needle Necessities”-- a must for every stitcher!

Francesca, I love your creative touches to this project, and I’m very happy that you enjoyed the project so much! Maybe this will be the start of a collection of “needle necessities”. Thank you for sharing your beautiful work.

Thursday, January 7, 2010

catching up on things...

I'm slowly beginning to take down all our Christmas decorations. Only the tree, the wreath on the front door, and the wooden nativity set are left. I always like to leave things up for the 12 days of Christmas, but I'm now ready to move on.

One of the other things I've been busy doing is cleaning out my email messages. Yikes! My in-box has gotten out of control. I think my messages are multiplying faster than rabbits! I try to respond to as many of your blog comments as I can, but I'm afraid over the past few months I've not been very good. Please accept this thank you to all who have written. Your comments mean so much to me!

I'm now gearing up for the Nashville tradeshow in February. As you can imagine, the next few weeks will be quite busy. I'm also starting a new project, a sewing case. (I'm not sure if it will be ready for Nashville.) I hope to start stitching on it today--a perfect way to spend a snowy afternoon.

I leave you with this photo of Haiden who enjoyed looking at the reindeer in our front yard. He would have preferred for us to keep the door open so he could get a better view, but it was way too cold. My compromise was to open the blinds in our living room. Don't you love to see the amazement in a young child's eyes?

Monday, January 4, 2010

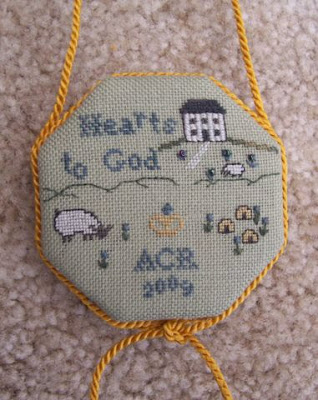
Laurie shows off her Shaker Pinkeep design

Laurie P of Nebraska recently completed A Shaker Pinkeep. The verse used on this two-sided pinkeep, Hands to Work, Hearts to God, illustrates the strong work ethic of the Shakers as well as their devotion to God.

Laurie wrote, I'm so proud of this, I had to find you on the internet and share with you!

I stitched this as a gift for one of my best friends back home in Indiana. I am just learning how to do other finishes other than having stuff framed, and this was my first attempt other than just plain stuffing at anything like this!

The first shot I took just to get the color of the fabric which got lost in the pics of the finished ornament, but here's my finished work. All materials are as suggested in your pattern, except I cut foam core for the hexagon and used some cording I had on hand for the trim. I hope you like it, too!
Yes, Laurie, I definitely like what you did with this design! You did such a beautiful job with the stitching and assembly. What a cute idea to turn the pinkeep into a hanging ornament. Thank you for sharing the photos. I'm sure that your friend is enjoying her very special gift!

Friday, January 1, 2010

a slow start to 2010

Happy New Year!!!

I hope that your new year of stitching is off to a better start than mine. Despite being out late last night at a New Year’s Eve party, I still found myself awake before 6am!! (In all honesty, I was a bit pleased because I thought to myself I could get in a couple of hours of stitching on Deborah Walker, my 2010 New Year’s Day start, before anyone else got up.) It was after 9am before I saw anyone else…can you imagine 3 hours of uninterrupted stitching time, except for a couple of breaks to get myself another cup of coffee? So far, so good, right?

As I was stitching, I kept looking at what I had stitched and at the photo of the sampler on the chart. The photograph sure looked prettier than what I was stitching. The model in the photo had been stitched using DMC threads, and I did a conversion to silk threads months ago. Yikes! Heavens knows what I was thinking when I made my thread conversion, because my choices were terrible. I next spent time ripping (or rather cutting out), my three hours of stitching. (Yikes!) Thankfully, cutting out goes much quicker than stitching. I then got in two letters using the designated DMC thread. I’m much happier with the result so far. I just wish I’d made the discovery before putting in three hours of stitching!

We’re getting ready to go out and do some things with our son and daughter-in-law, but hopefully I can stitch tonight while we watch the University of Florida versus the University of Cincinnati football game at the Sugar Bowl. I’m not sure who everyone will be rooting for since we have family ties to both schools. My son asked me who I was going to cheer for, and I said my team wasn’t either of those….I’m a Florida State fan, instead. The truth of the matter is that I’m not much of a sports fan. I guess that explains how I can stitch and watch football at the same time, right?

Regardless of what your plans are for the day, I hope that your year is off to a good start and that you can at least get in a few stitches. Don’t forget to eat some black-eyed peas for luck!